
Enterprise Quick Start
Install the Meetily Enterprise server with one command, create your organization, and get your whole team on Meetily with one key.
At a glance
One command installs the server. A short setup in your browser creates your organization. Then you send one key to your whole team, and each person shows up in your dashboard as they join. There are no users to add one by one.
Meetily Enterprise
Meetily Enterprise runs on your own server. You choose the transcription and summary settings once in the dashboard, and every computer that joins your organization gets them.
This guide is for the IT admin who sets it up. It takes you from an empty server to your first people in the dashboard.
Before you start
- A name for the server, for example
meet.yourcompany.com, in your DNS. - Port 443 open, so people's computers can reach the server.
- About 10 minutes. Most of it is the installer working alone.
The server runs on Linux (x64 or ARM64), on a Mac with Apple silicon, or on Windows.
Quick Start
Install the server with one command (Linux or Mac) or the setup program (Windows).
Open the setup link and create your organization in five short screens.
Send everyone the app download links and your Organization key.
Each person pastes the key in Meetily and appears in your dashboard.
Install the server
Run this on the server, in a terminal:
curl -fsSL https://meetily.ai/server | sudo bashThe installer does the rest. Along the way it asks you three questions, described below. At the end it prints a setup link.
Download Meetily Enterprise Server for Windows (64-bit setup program, .exe) and run it as administrator. Page by page:
- Data folder. Keep the default,
C:\ProgramData\MeetilyServer. - Port. Keep 443, and leave Open this port in Windows Firewall checked.
- Certificate. Choose Certificate from Let's Encrypt and type the server's DNS name. It needs a public DNS name and port 443 open to the internet. Or choose Certificate from the Local Machine store and pick one from the list. For a
.pfxor.p12file, select Import from file... and type its password. - DNS record (Let's Encrypt only). It checks the name. If the name doesn't point to this server yet, it shows the A record to add. Add it, select Check again, then Next.
- Model files. Skip it: leave the list empty.
- Install. It installs the service and the firewall rule. With Let's Encrypt it waits up to 2 minutes for the certificate.
- Setup link. The last page shows the setup link with a Copy button. Open it in a browser and go on to Create your organization.
Certificate
The first question is how the apps get a trusted certificate:
How do the apps get a trusted certificate for this server?
1) Let's Encrypt: the server gets one and renews it by itself. It needs a
public DNS name and port 443 open to the internet.
2) My own certificate files (PEM): for example from your company's CA.
Choose 1 or 2: 1- 1) Let's Encrypt. Nothing to buy and nothing to renew. The server needs a public DNS name. This is the easiest setup.
- 2) Your own certificate files. Use this when the server is only on your internal network. The installer then asks for the full path of each file on the server:
Choose 1 or 2: 2
Certificate chain file (PEM): /etc/meetily-server-certs/fullchain.pem
Private key file (PEM): /etc/meetily-server-certs/privkey.pem
The server's DNS name [meet.acme.com]:
The installer checks that it can read both files, and suggests the DNS name from the certificate: press Enter to keep it.
Keep the certificate files where they are
The server reads them from that path each time it starts. When you renew the certificate, replace the files at the same path and restart the server.
DNS name
This server's public IP address is 203.0.113.10.
The server's DNS name, for example meet.example.com: meet.acme.com
meet.acme.com does not point to this server yet.
At your DNS provider, add this record:
Type: A    Name: meet.acme.com    Value: 203.0.113.10
Press Enter when you have added it:
meet.acme.com points to this server.
Add the record at your DNS provider, then press Enter. The installer checks the name for you. A new record can take a few minutes; press Enter again to check again. In a cloud, give the server a fixed IP address (in AWS, an Elastic IP).
Port 443
Port 443 must be open to the internet. In a cloud, allow it in the server's
security group or firewall rules.
Press Enter when it is open:
The installer opens the port on the server itself. A cloud firewall (for example an AWS security group) is outside the server, so you open that one.
Setup link
Now the installer works alone: it installs the server, opens the firewall on this machine, starts the service and gets the certificate (up to 2 minutes). At the end it prints:
Done
Server address: https://meet.acme.com
Setup link (works once, for 24 hours; keep it private):
https://meet.acme.com/setup#code=…
Open it in a browser and create the owner account.
Open the link in your browser to create your organization.
Create your organization
The setup link opens five short screens. Your free trial starts right away: 30 days, up to 10 people, no license key needed. The numbers in each list match the numbers on the screenshot.
Owner account
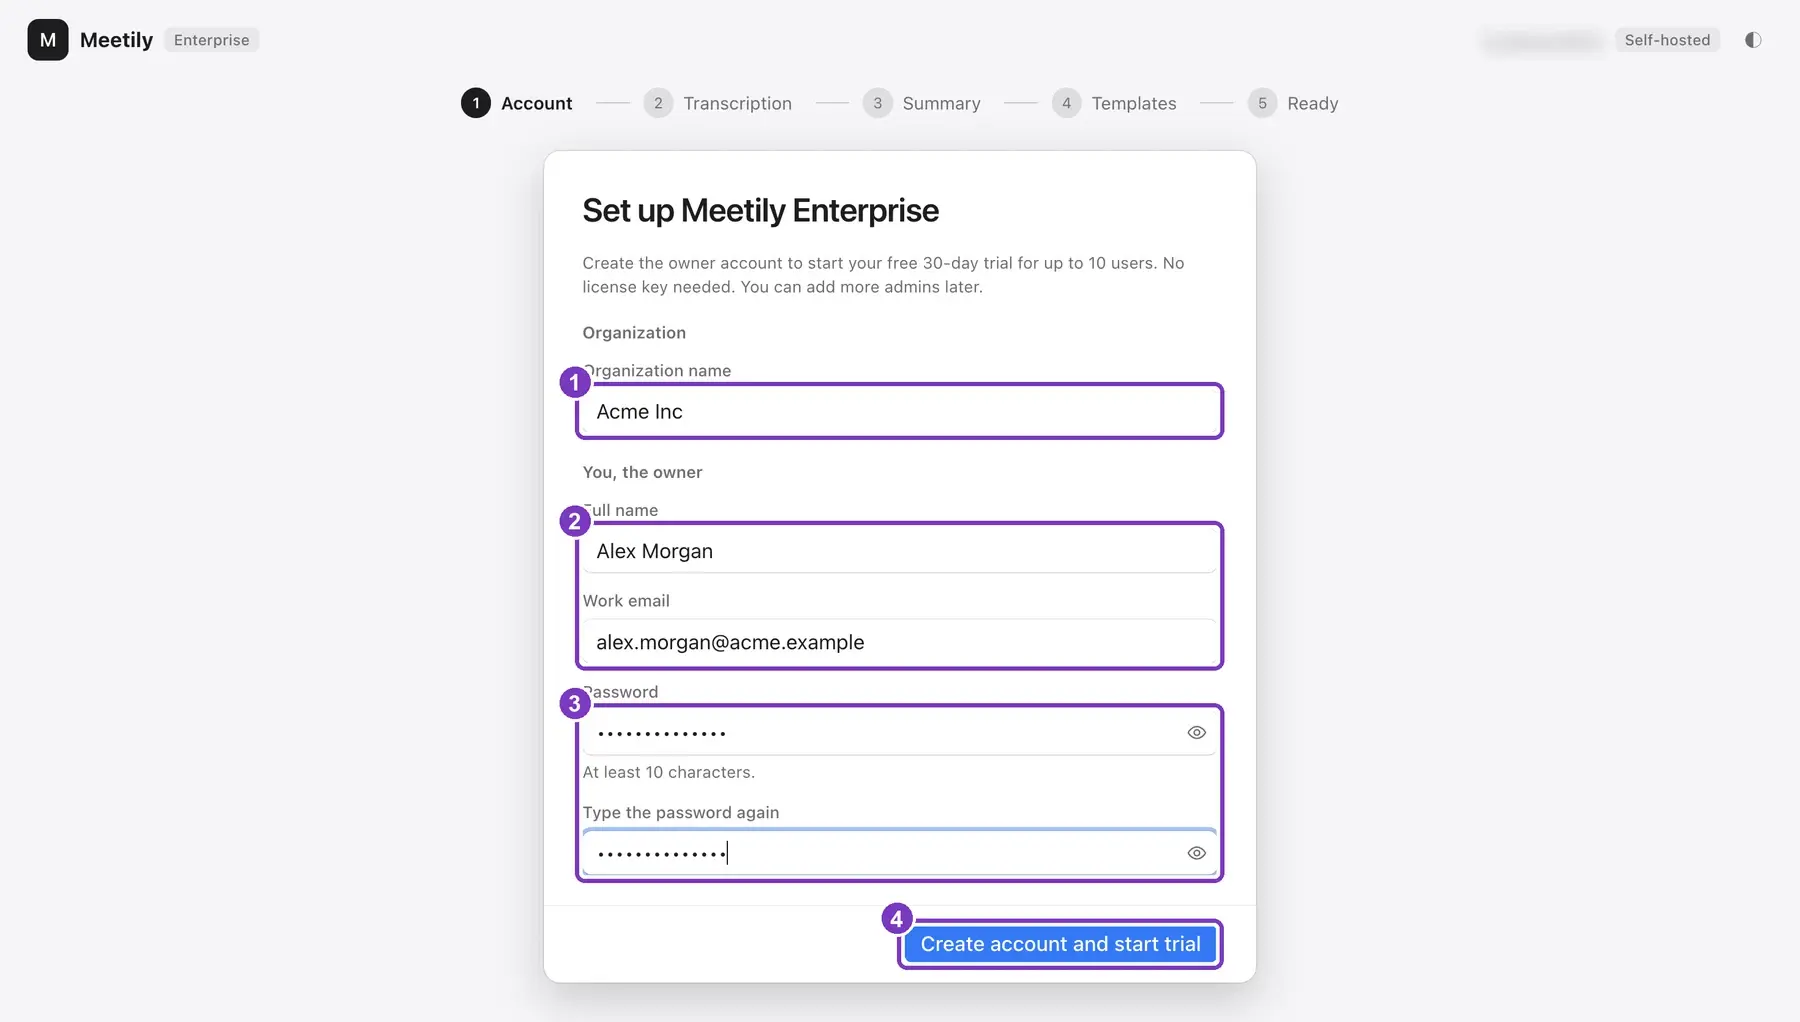
- Your organization's name. People see it in the app. It can't be changed later.
- Your name and work email. You are the owner of the dashboard.
- A password of at least 10 characters, typed twice.
- Select Create account and start trial.
Transcription
Choose how meeting audio turns into text.
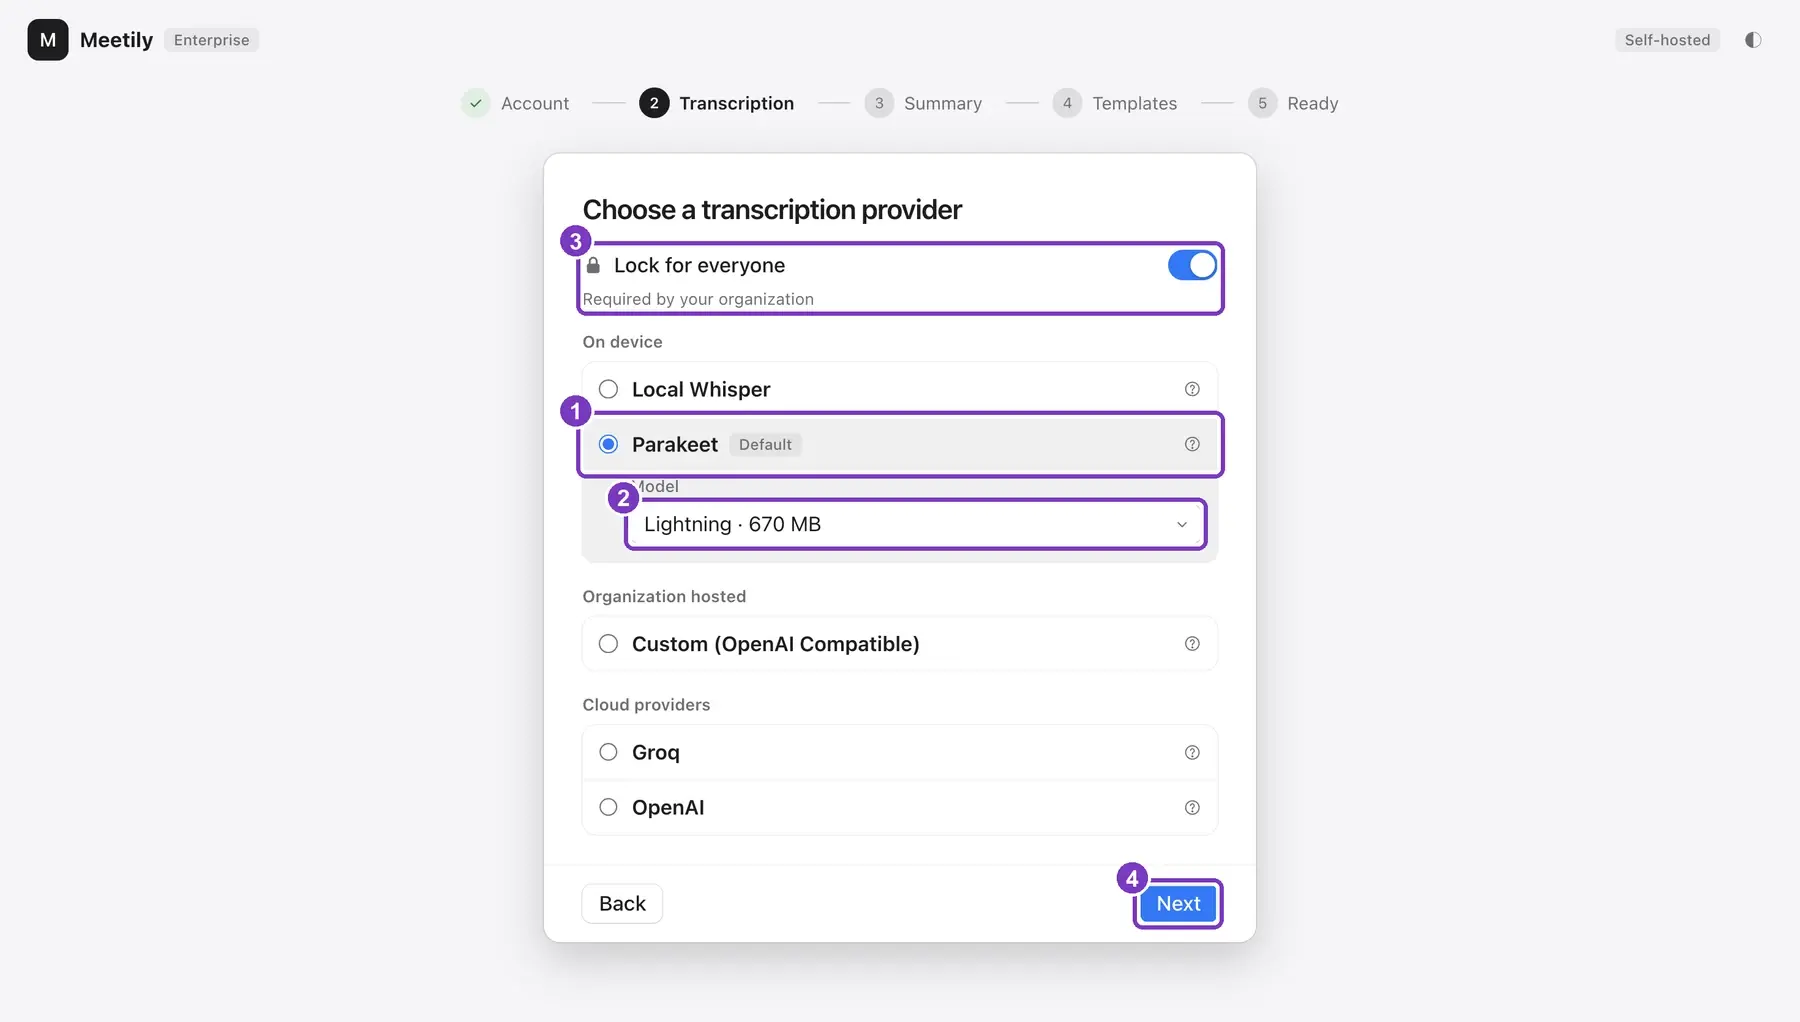
- Parakeet runs on each person's computer, so audio never leaves it. It is the default; keep it.
- The model. Keep the default, Lightning.
- Lock for everyone: when it is on, people can't change this in the app.
- Select Next.
Summary
Choose which AI writes the meeting notes.
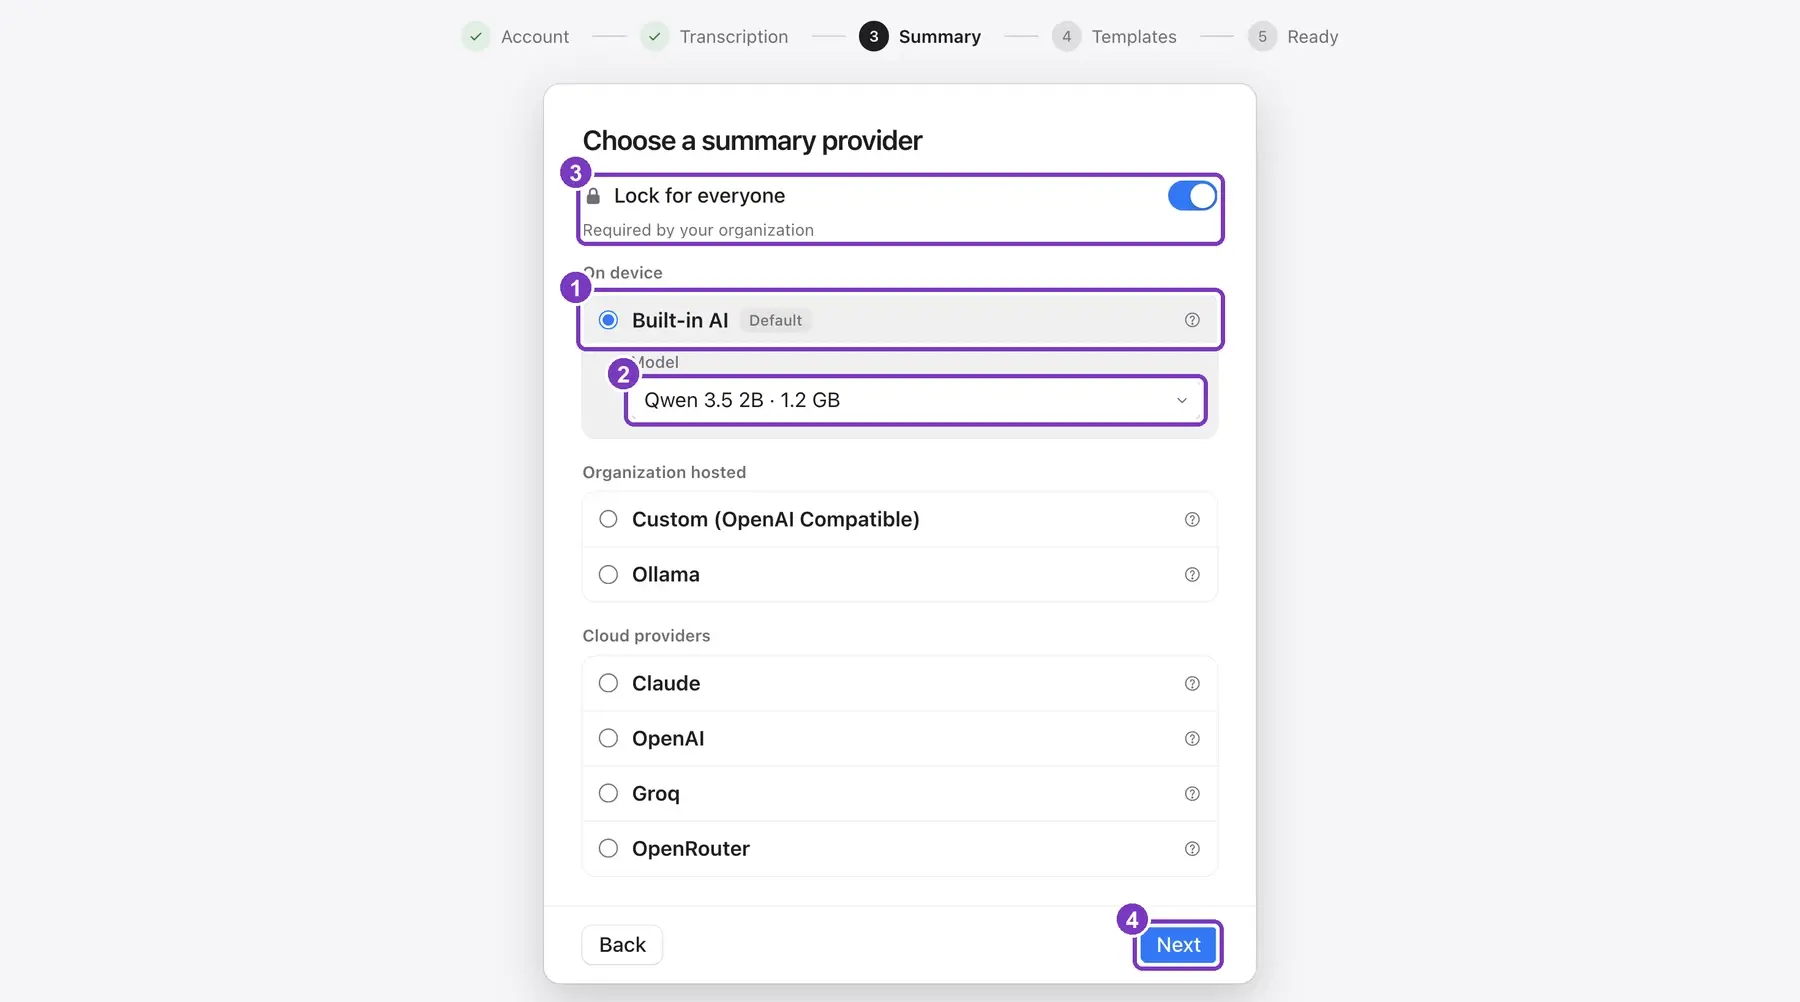
- Built-in AI also runs on each computer. It is the default; keep it.
- The model. Keep the default, Qwen 3.5 2B.
- Lock for everyone, as before.
- Select Next.
Want to use your own AI server or a cloud service instead? Pick it here. It asks for its address or API key. You can change this any time later.
Template
Choose the shape of the meeting notes.
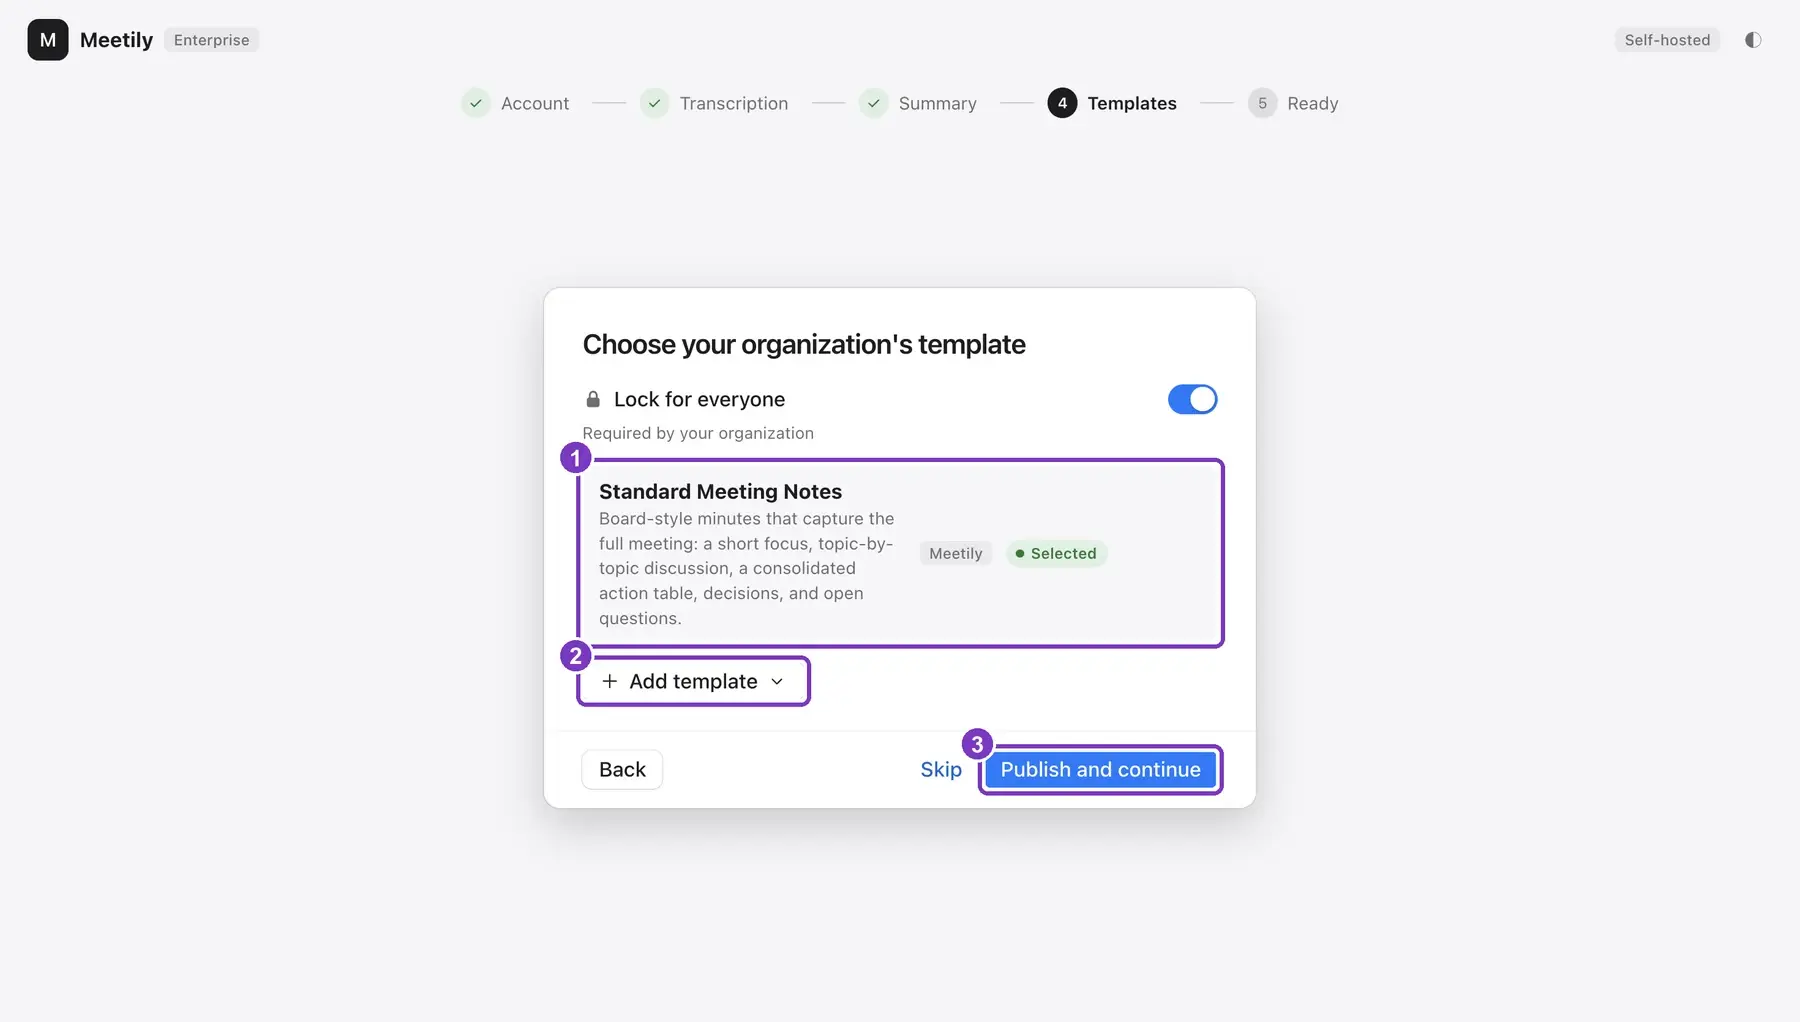
- Standard Meeting Notes is selected for everyone.
- Add template if you want your own format. You can skip this.
- Select Publish and continue. Your choices are sent to every computer that joins.
Ready
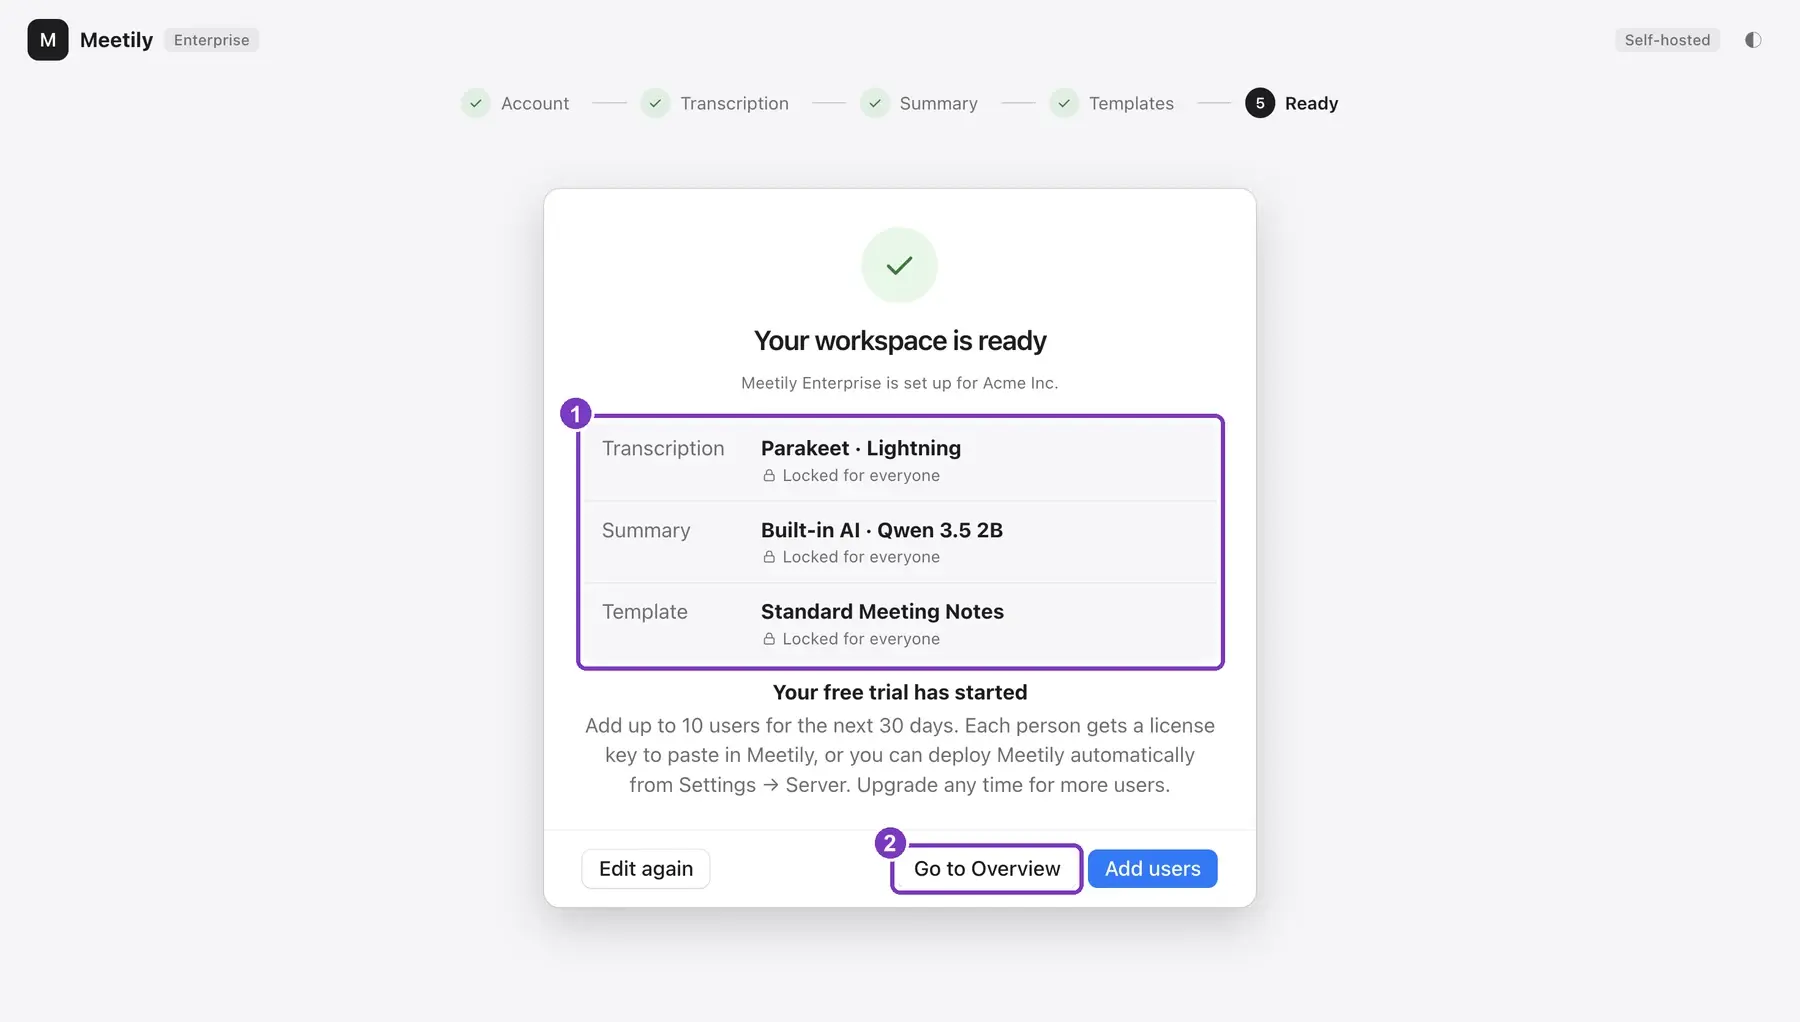
- Your choices. Change them any time in App Configuration.
- Select Go to Overview. You don't need to add users: see the next section.
Get your team on Meetily
Send one key instead of adding users
Adding users one by one is a hassle, so skip it. Copy your Organization key and send it to everyone. Each person pastes it once in Meetily, and they show up in your dashboard by themselves.
Copy the Organization key
Open Settings, then the Server tab.
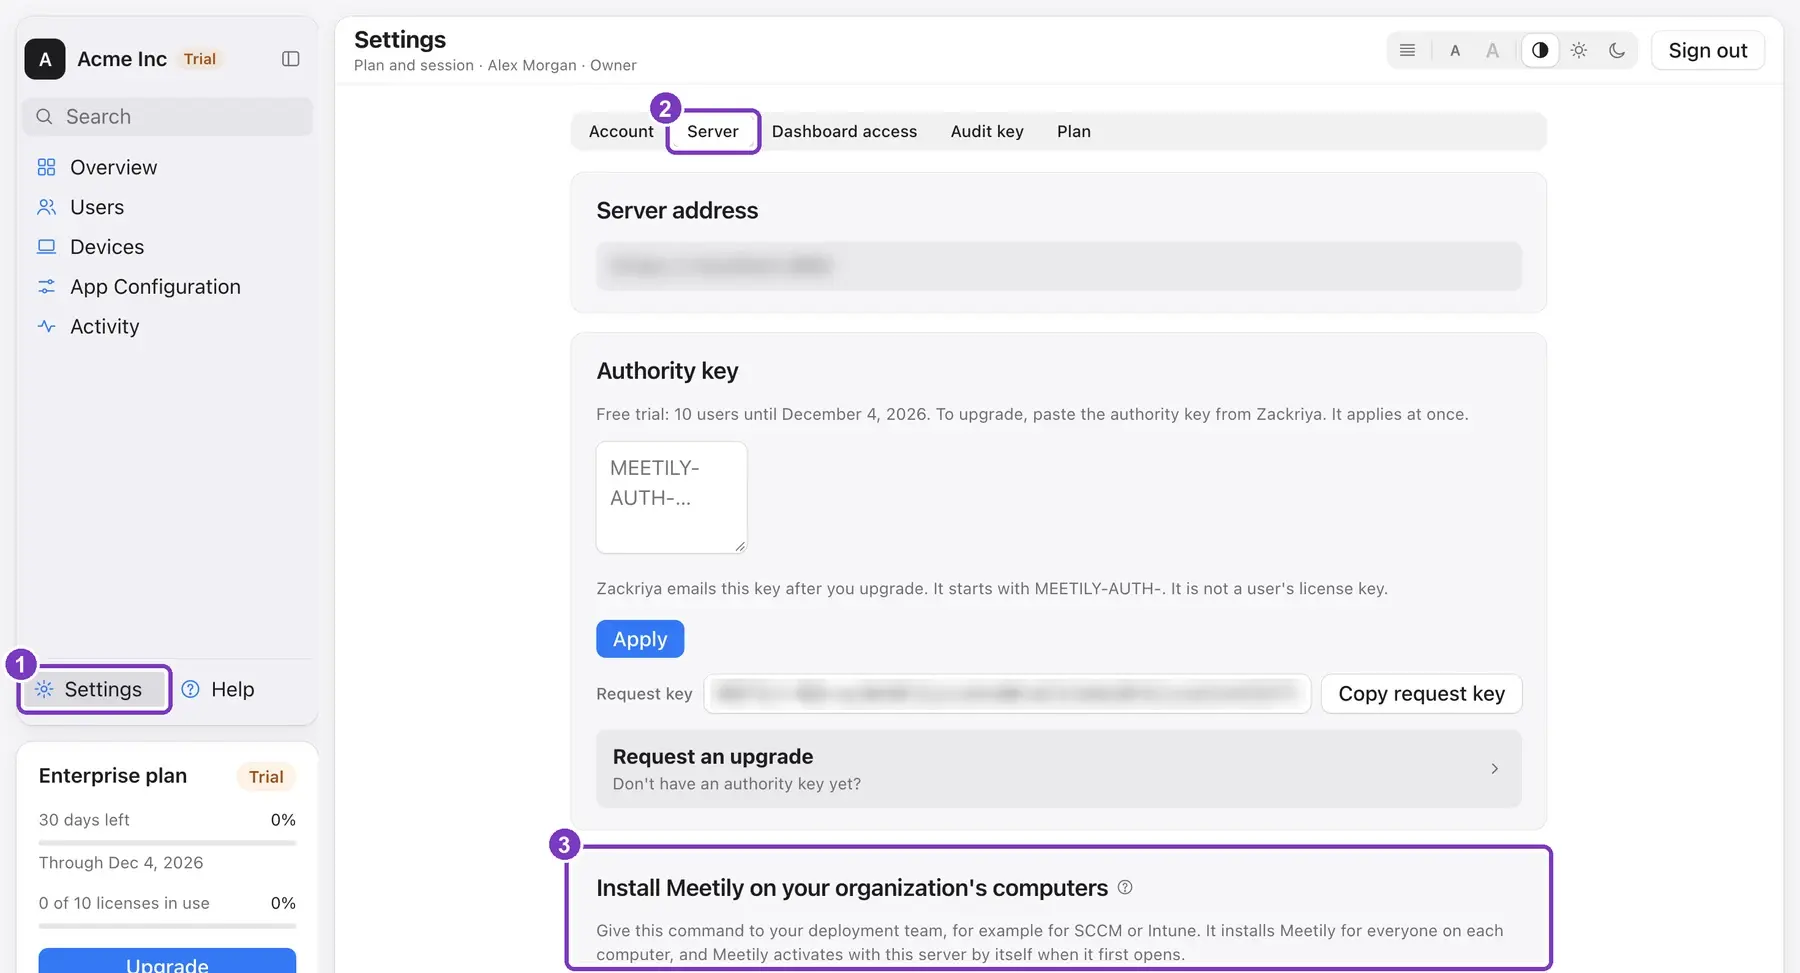
- Select Settings.
- Open the Server tab.
- Using SCCM or Intune? The install command for them is here. With it, Meetily installs and activates by itself, with no key to paste.
Scroll down to Organization key:
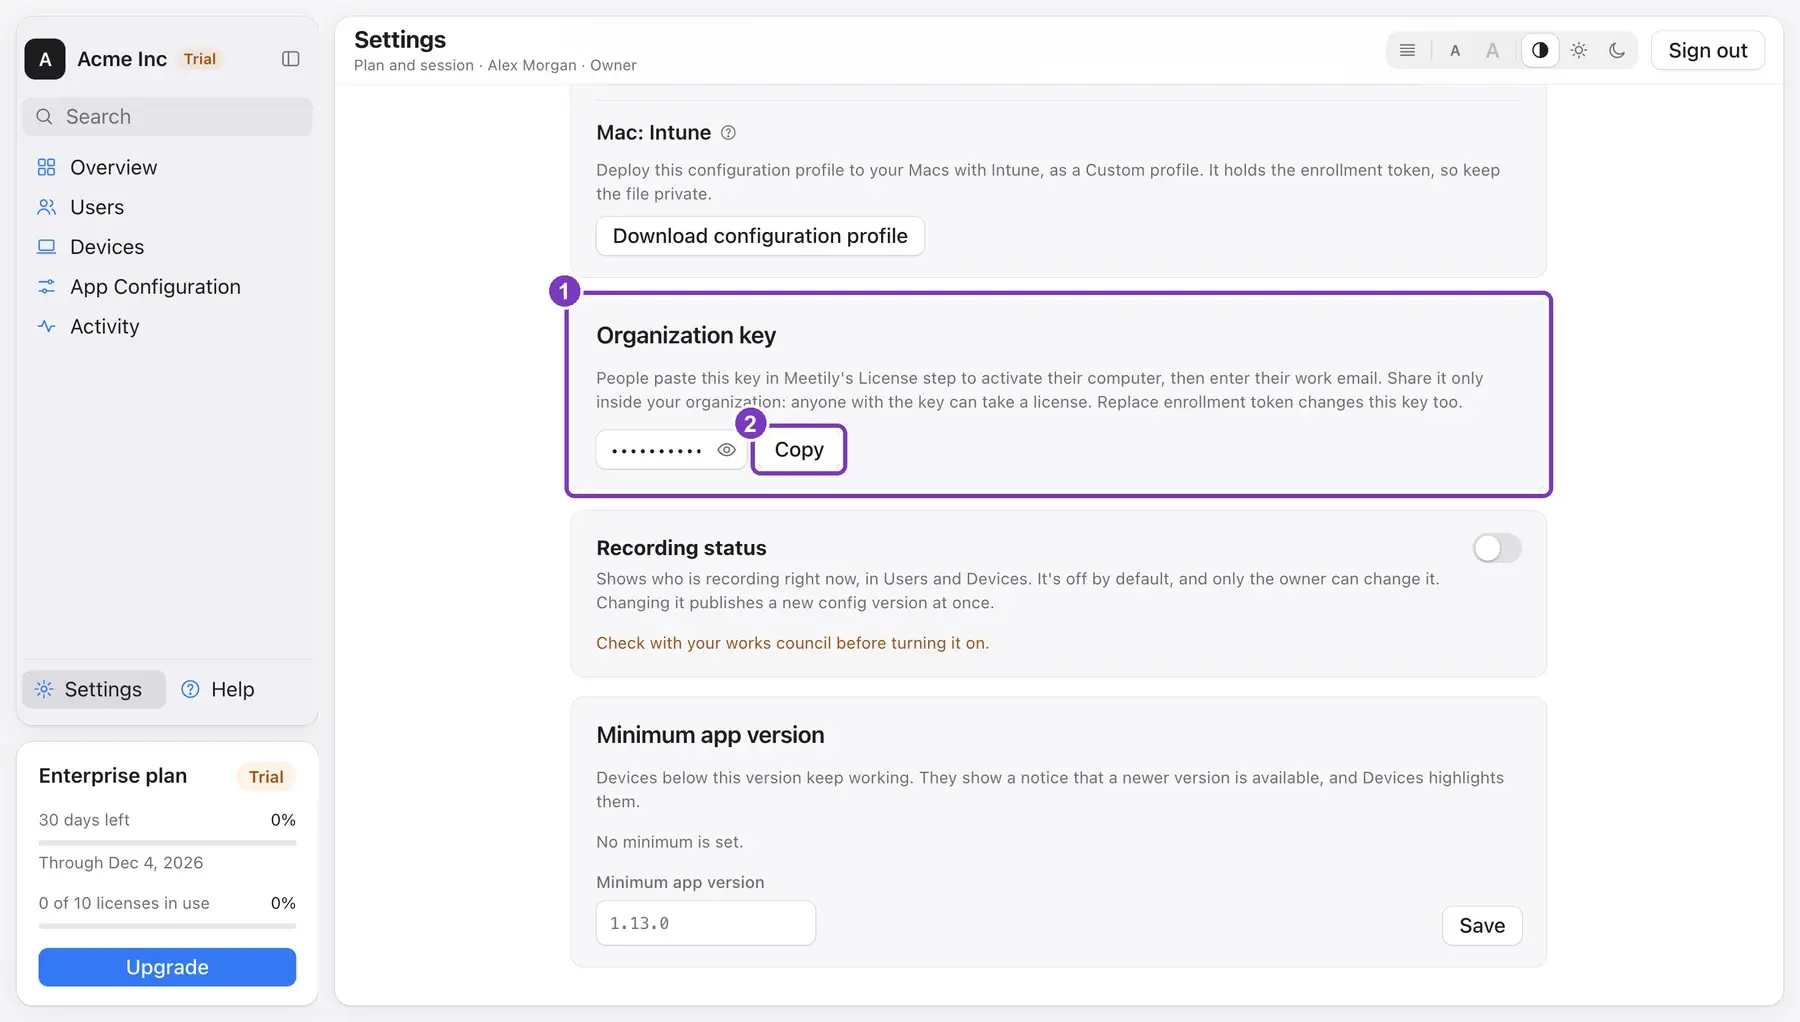
- The Organization key. Share it only inside your organization: anyone who has it can take a license.
- Select Copy.
Send everyone the app and the key
This is the main step: one message to your whole team, with the download links and the Organization key. People install Meetily Enterprise from these links:
Mac
Apple silicon, .dmg: meetily.ai/download/enterprise/mac
Windows
64-bit, .msi: meetily.ai/download/enterprise/windows
Paste the key into a message like this one and send it to your whole team:
Hi everyone,
We now use Meetily Enterprise for meeting notes. It runs on your own computer.
1. Install Meetily Enterprise:
Mac: https://meetily.ai/download/enterprise/mac
Windows: https://meetily.ai/download/enterprise/windows
2. Open it. At the License step, paste this key:
[Organization key]
3. Type your work email and click Continue.
That's all. Questions? Ask [your name].
What each person does
Each person sees two screens in the Meetily app.
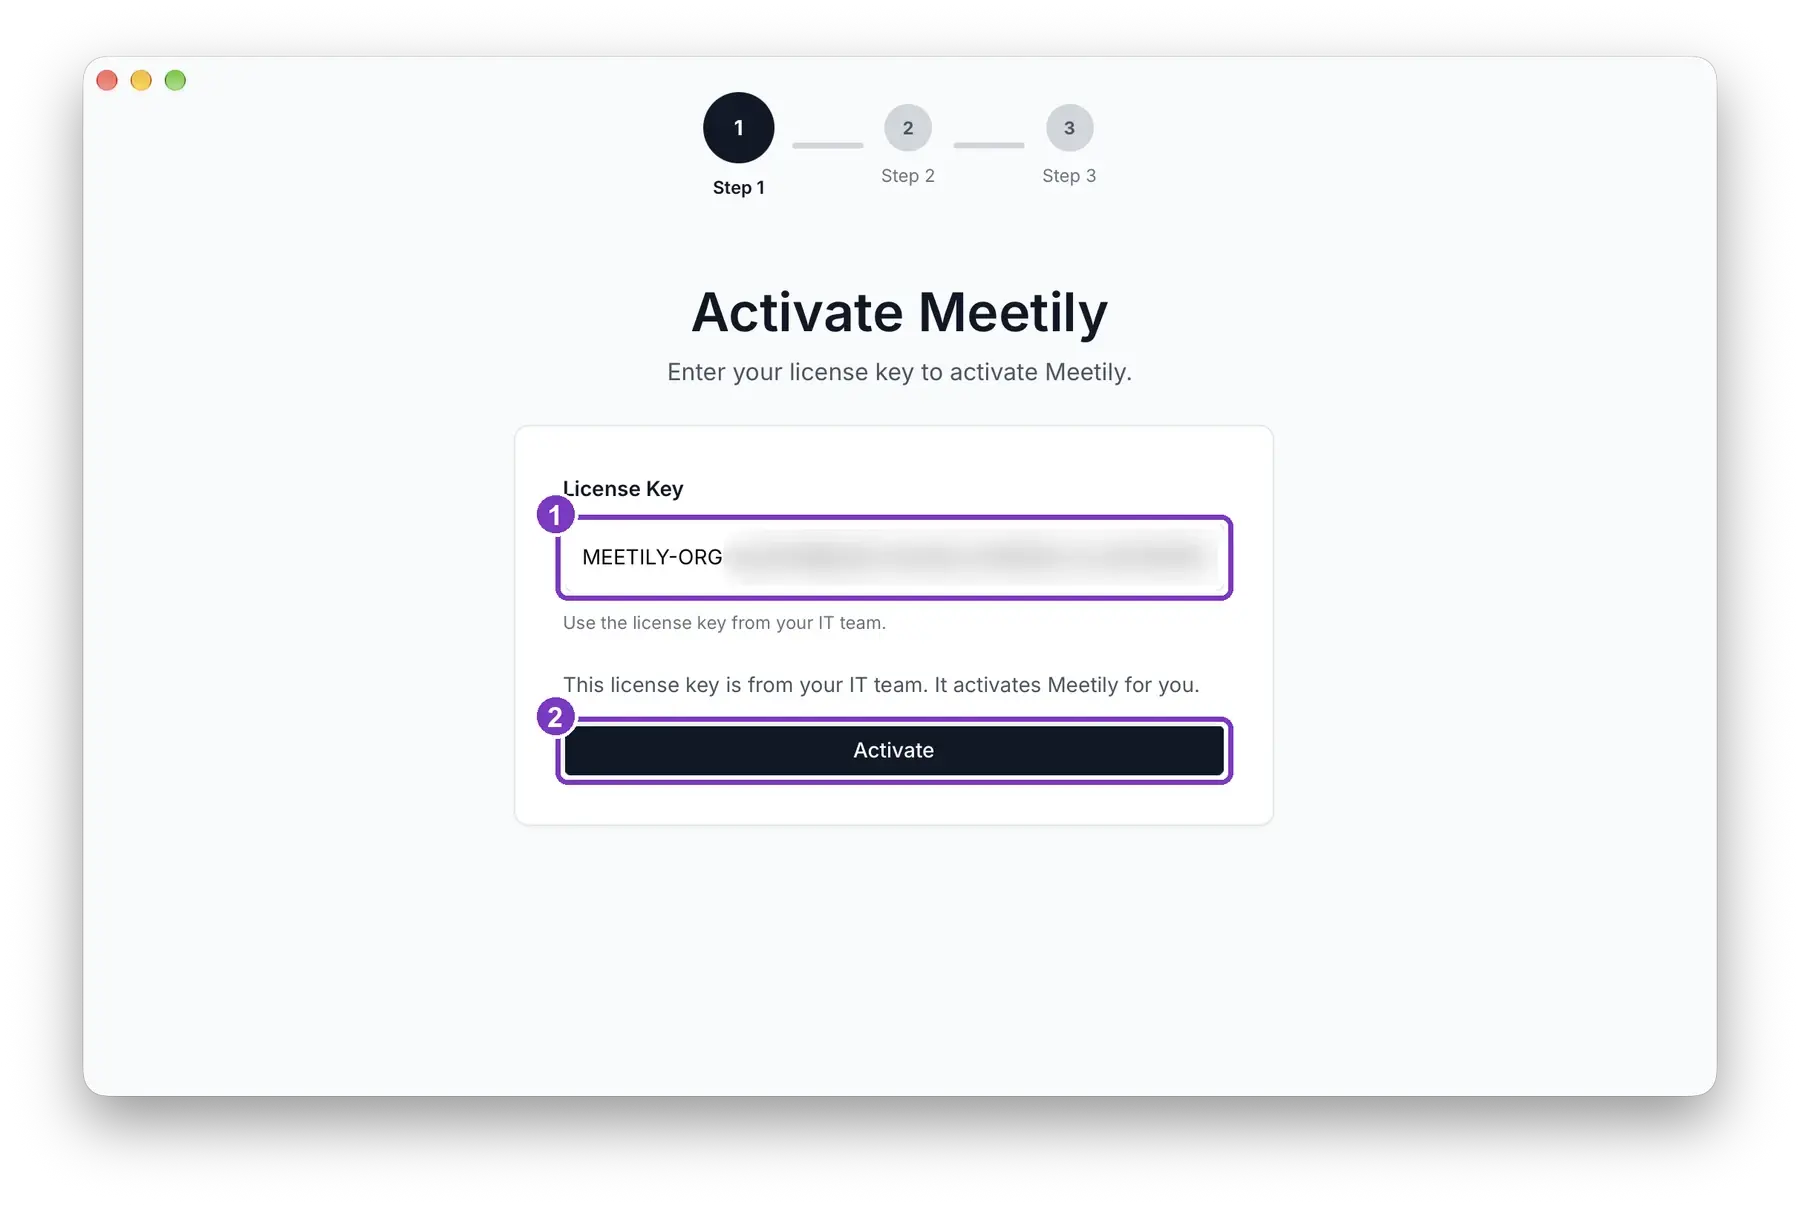
- They paste the Organization key.
- They select Activate.
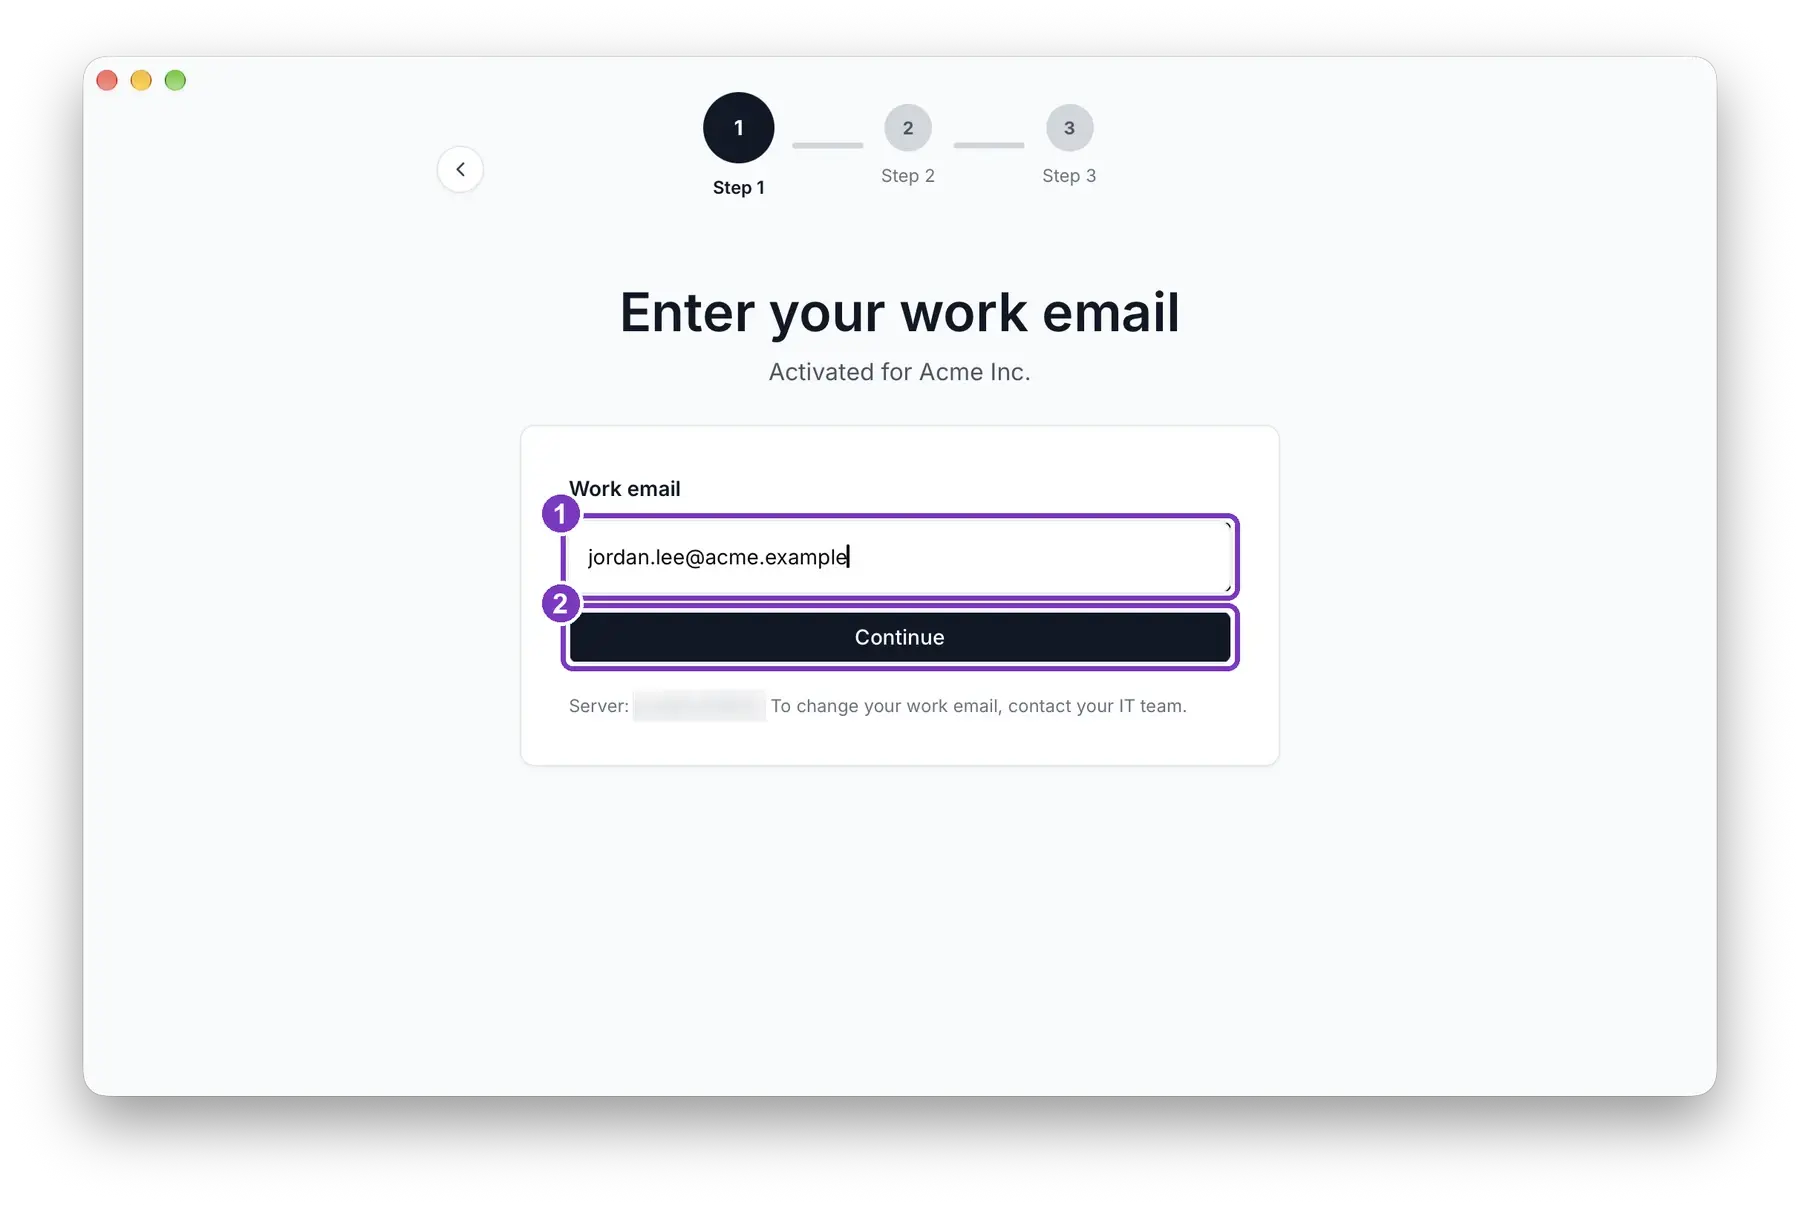
- They type their work email. Activated for Acme Inc. shows they joined your organization.
- They select Continue. Meetily gets your organization's settings by itself.
Check Users and Devices
Users and Devices fill up by themselves.
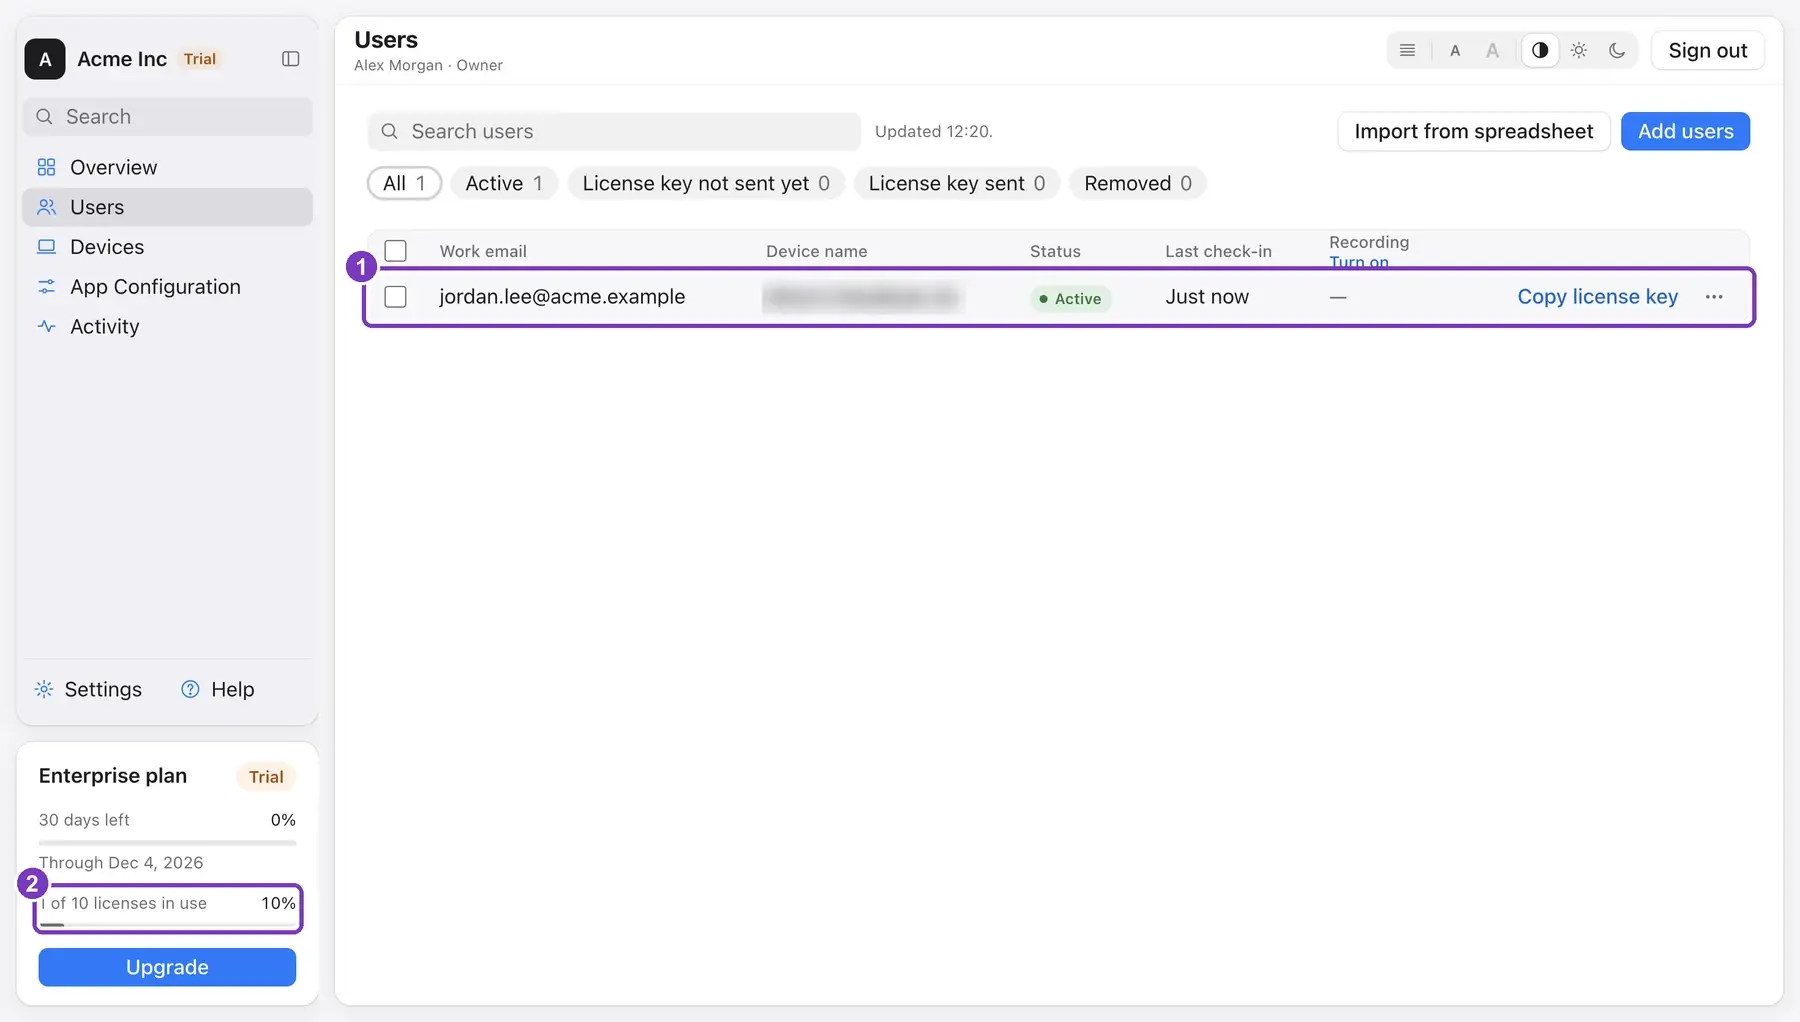
- Each person appears in Users as soon as they activate, marked Active.
- Licenses in use go up by one for each person.
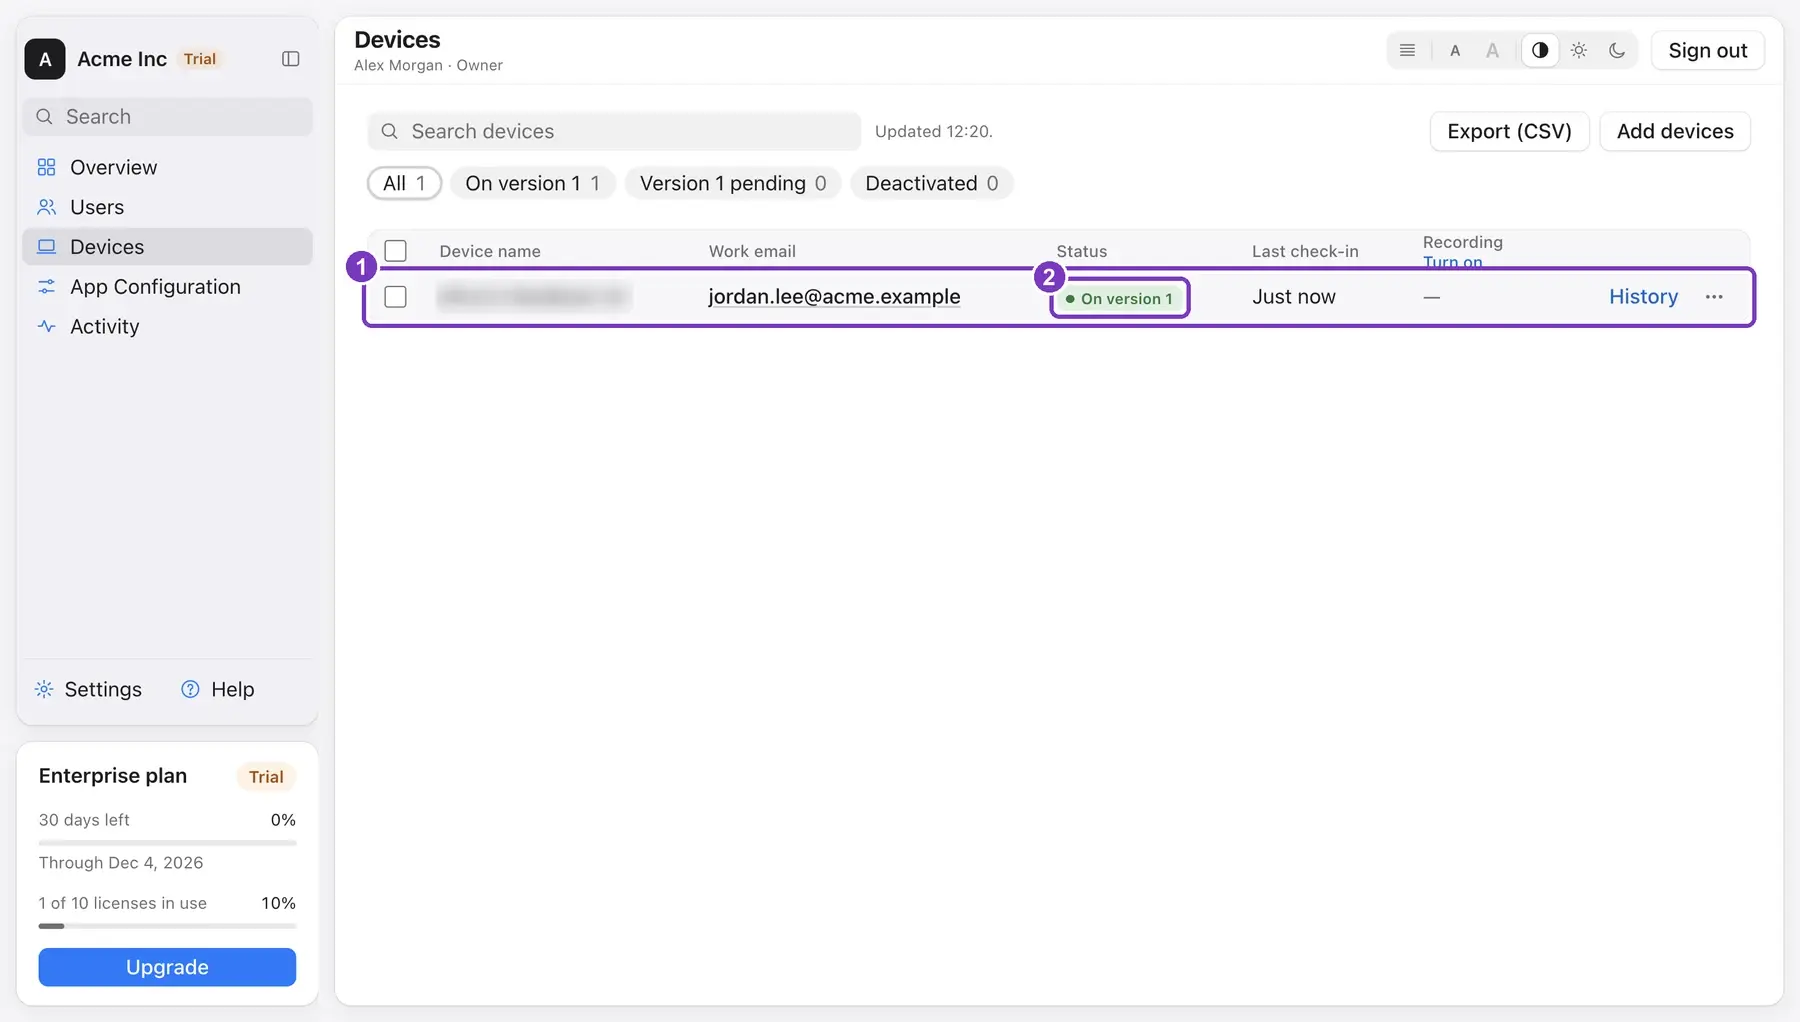
- Their computer appears in Devices.
- On version 1 means the computer has your latest settings.
Dashboard tour
Overview
Your home page.
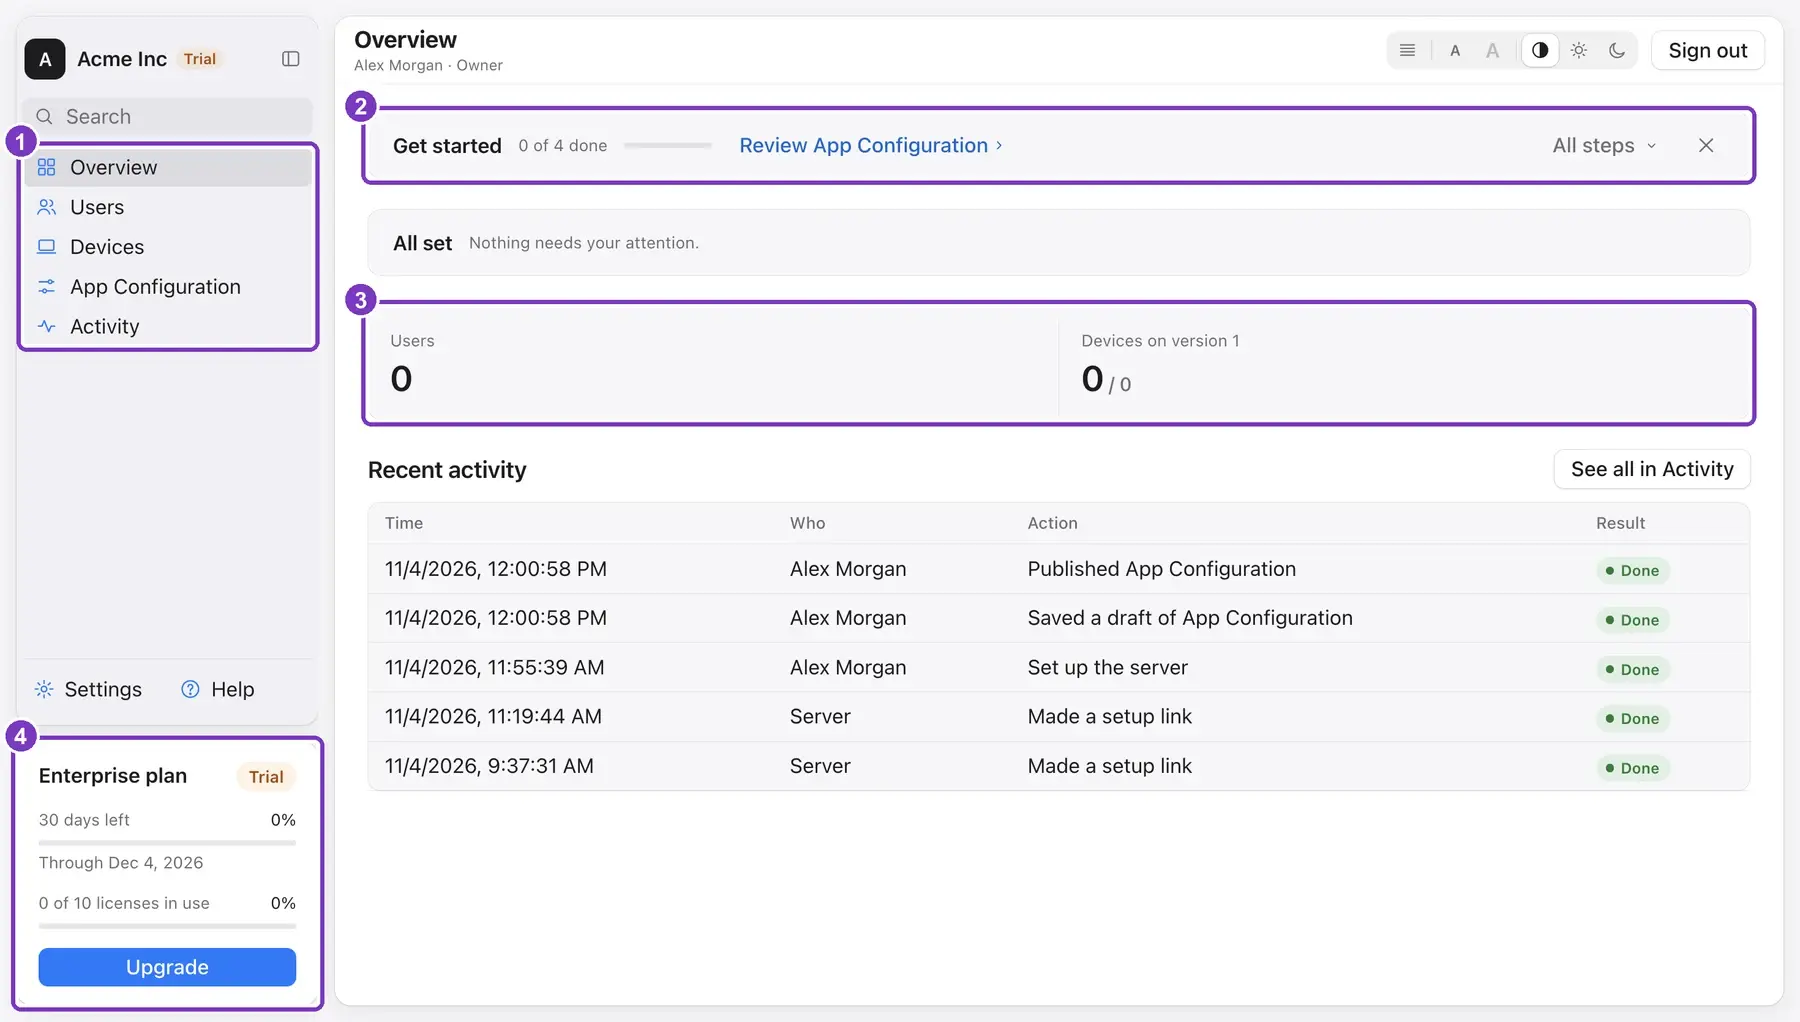
- The menu: Users, Devices, App Configuration and Activity.
- Get started: a short checklist. Hide it with the ✕ when you are done.
- How many people and computers have joined.
- Your plan: days left in the trial, licenses in use, and Upgrade.
App Configuration
Change what every computer uses.
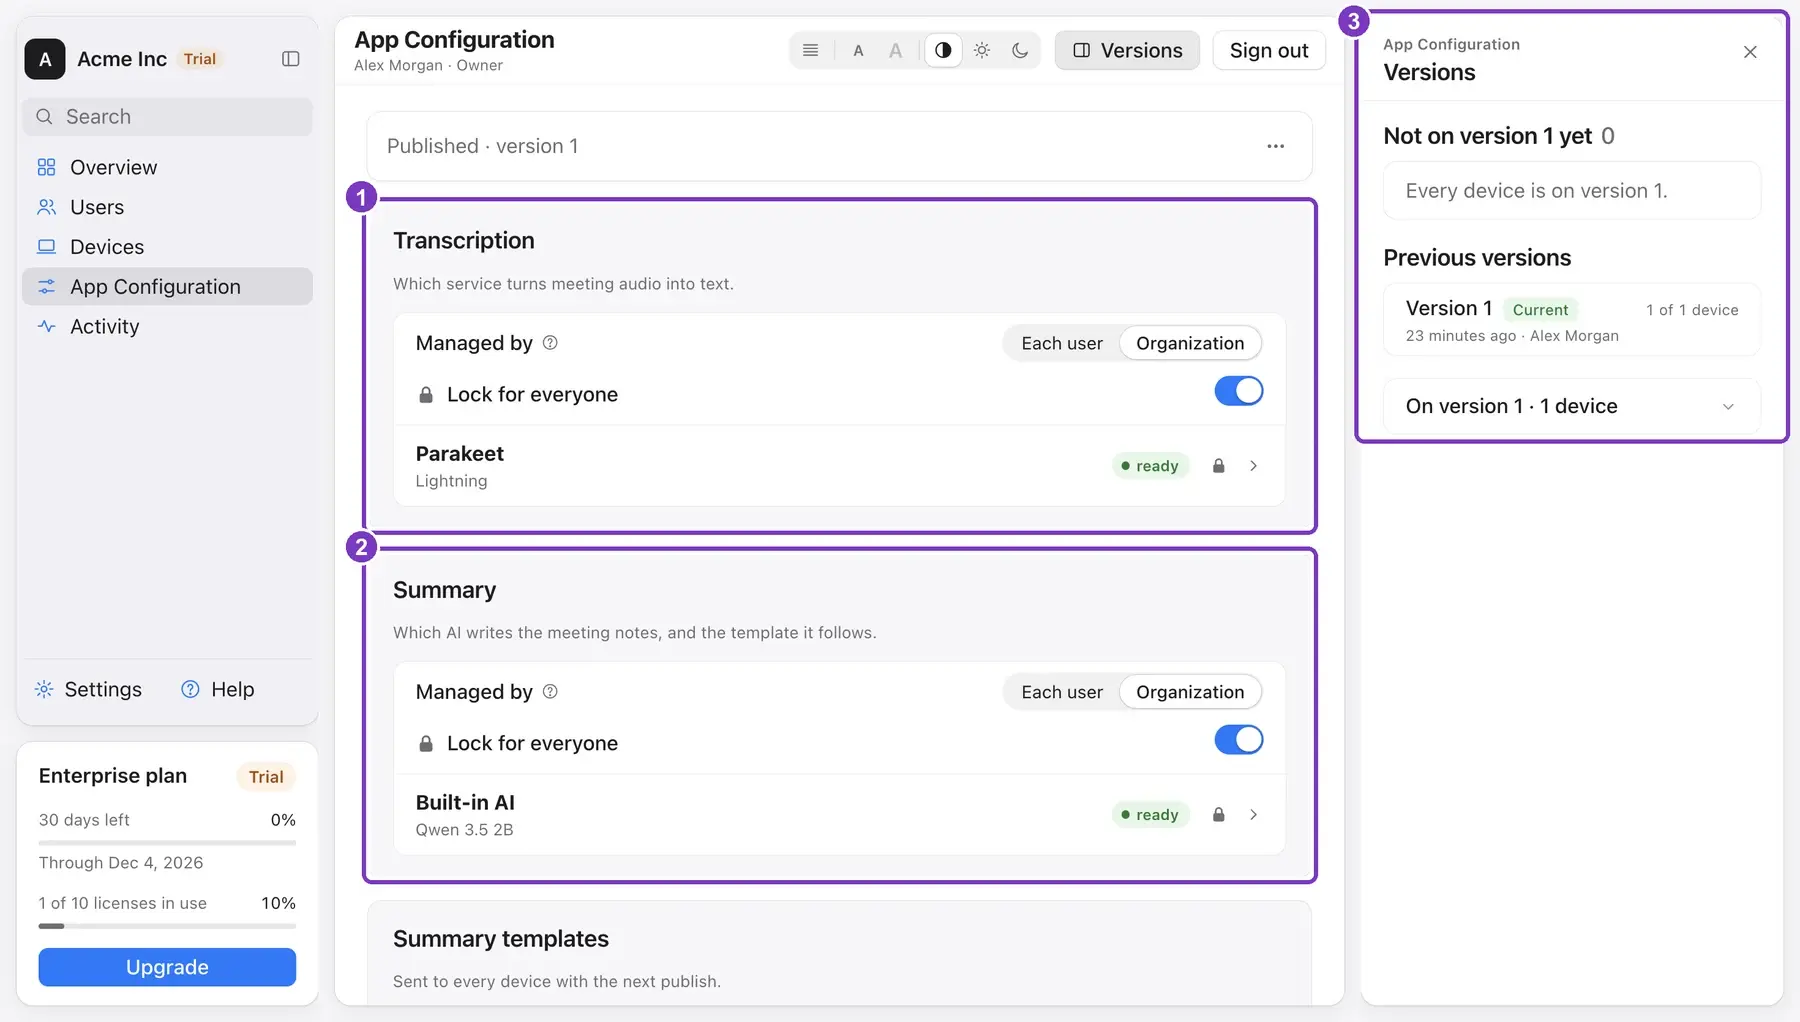
- Transcription: the provider you chose during setup, and whether it is locked.
- Summary: the same for meeting notes.
- Versions: each time you publish, the settings get a new version, and you see which computers have it.
Plan and upgrade
Open Settings, then the Plan tab.
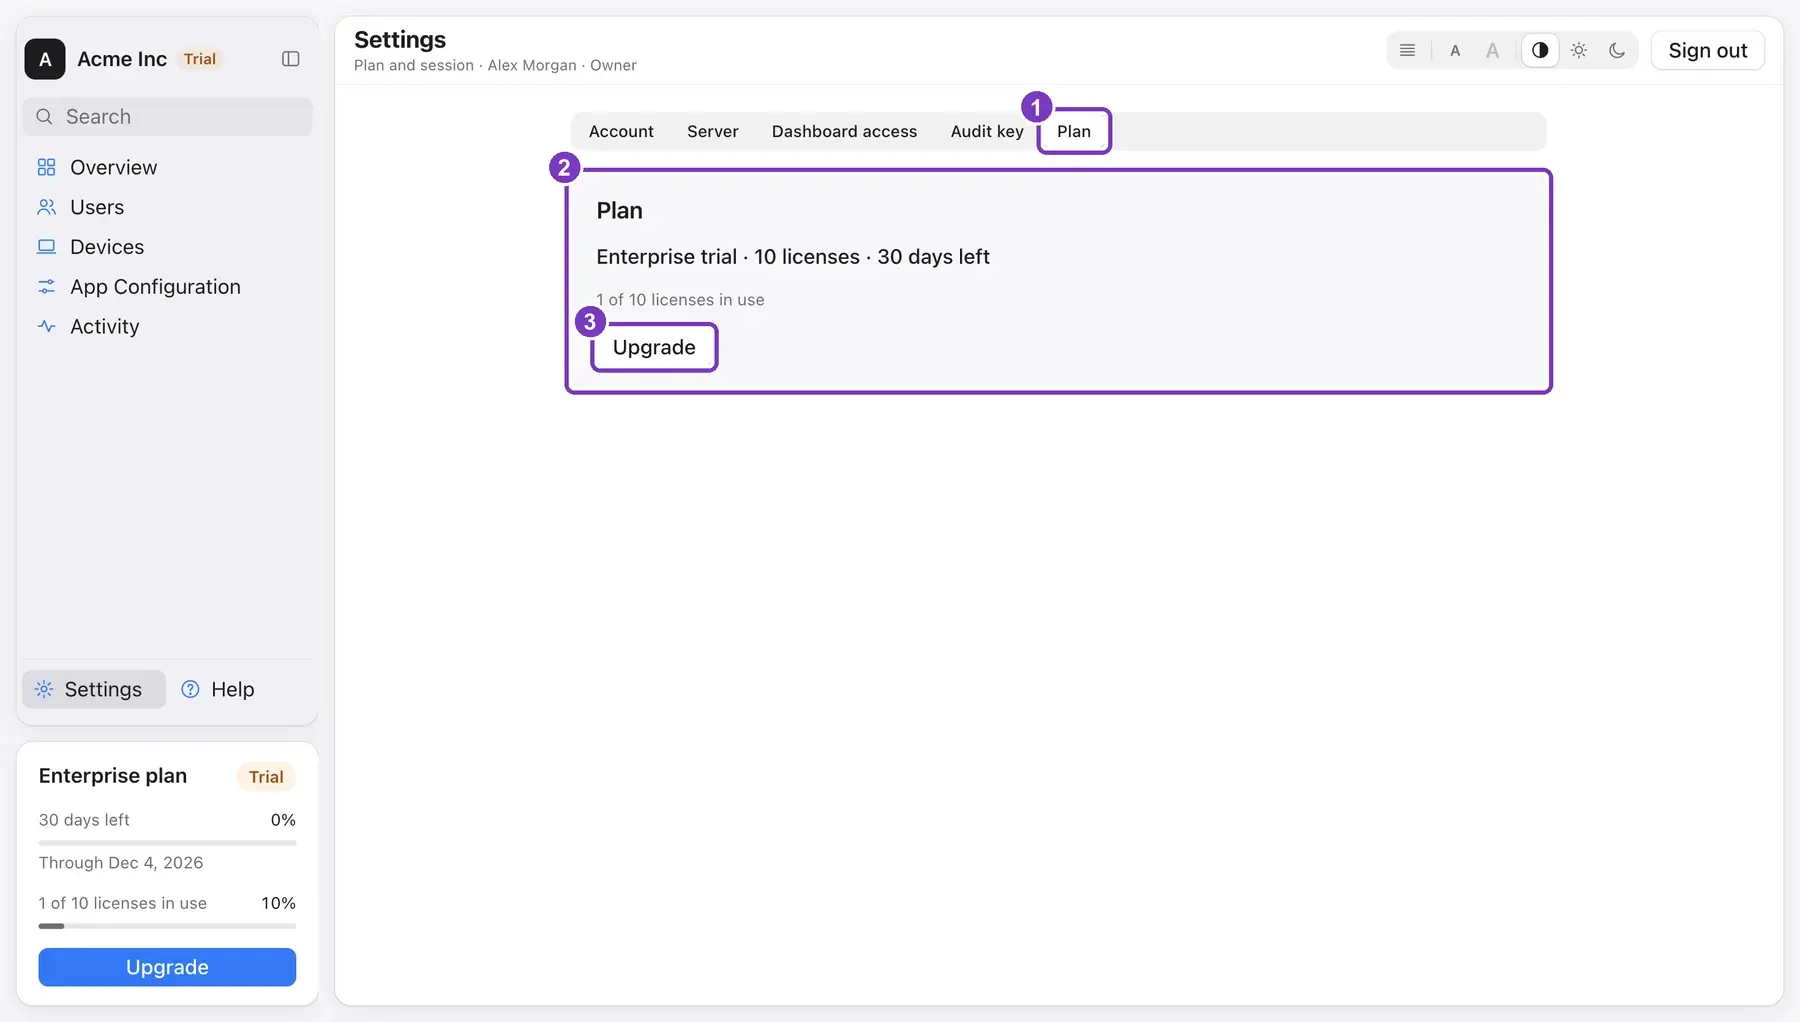
- The Plan tab in Settings.
- Your trial: licenses, days left, and licenses in use.
- Upgrade opens the upgrade request. Fill it in, select Use an email template, and send that email to us from your own email. It has your request key in it.
To upgrade, we need your request key. We reply with an authority key. Both keys are in Settings > Server, under Authority key:
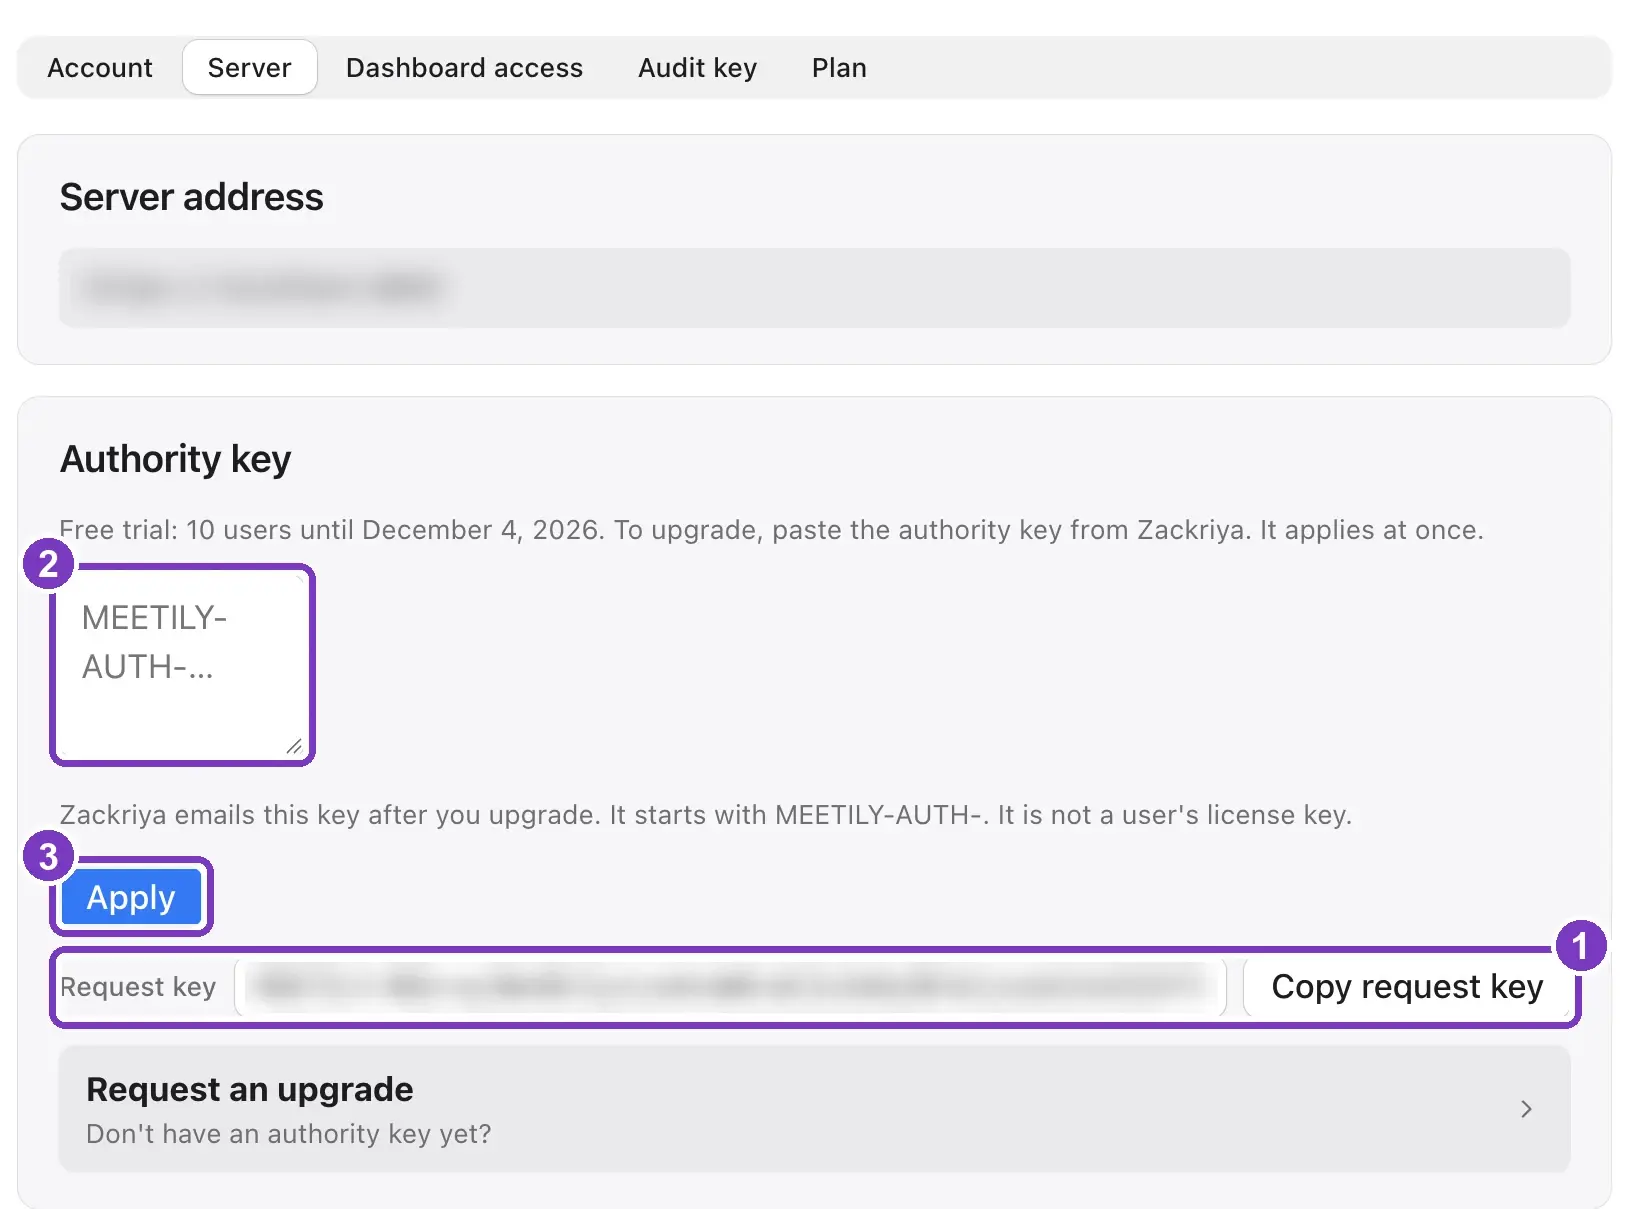
- Select Copy request key and email the key to meetily@zackriya.com. Or use the email template from Upgrade in the Plan tab: it has the key in it.
- When our reply comes, paste the authority key here.
- Select Apply. It works at once.
Help
Reach us from the dashboard.
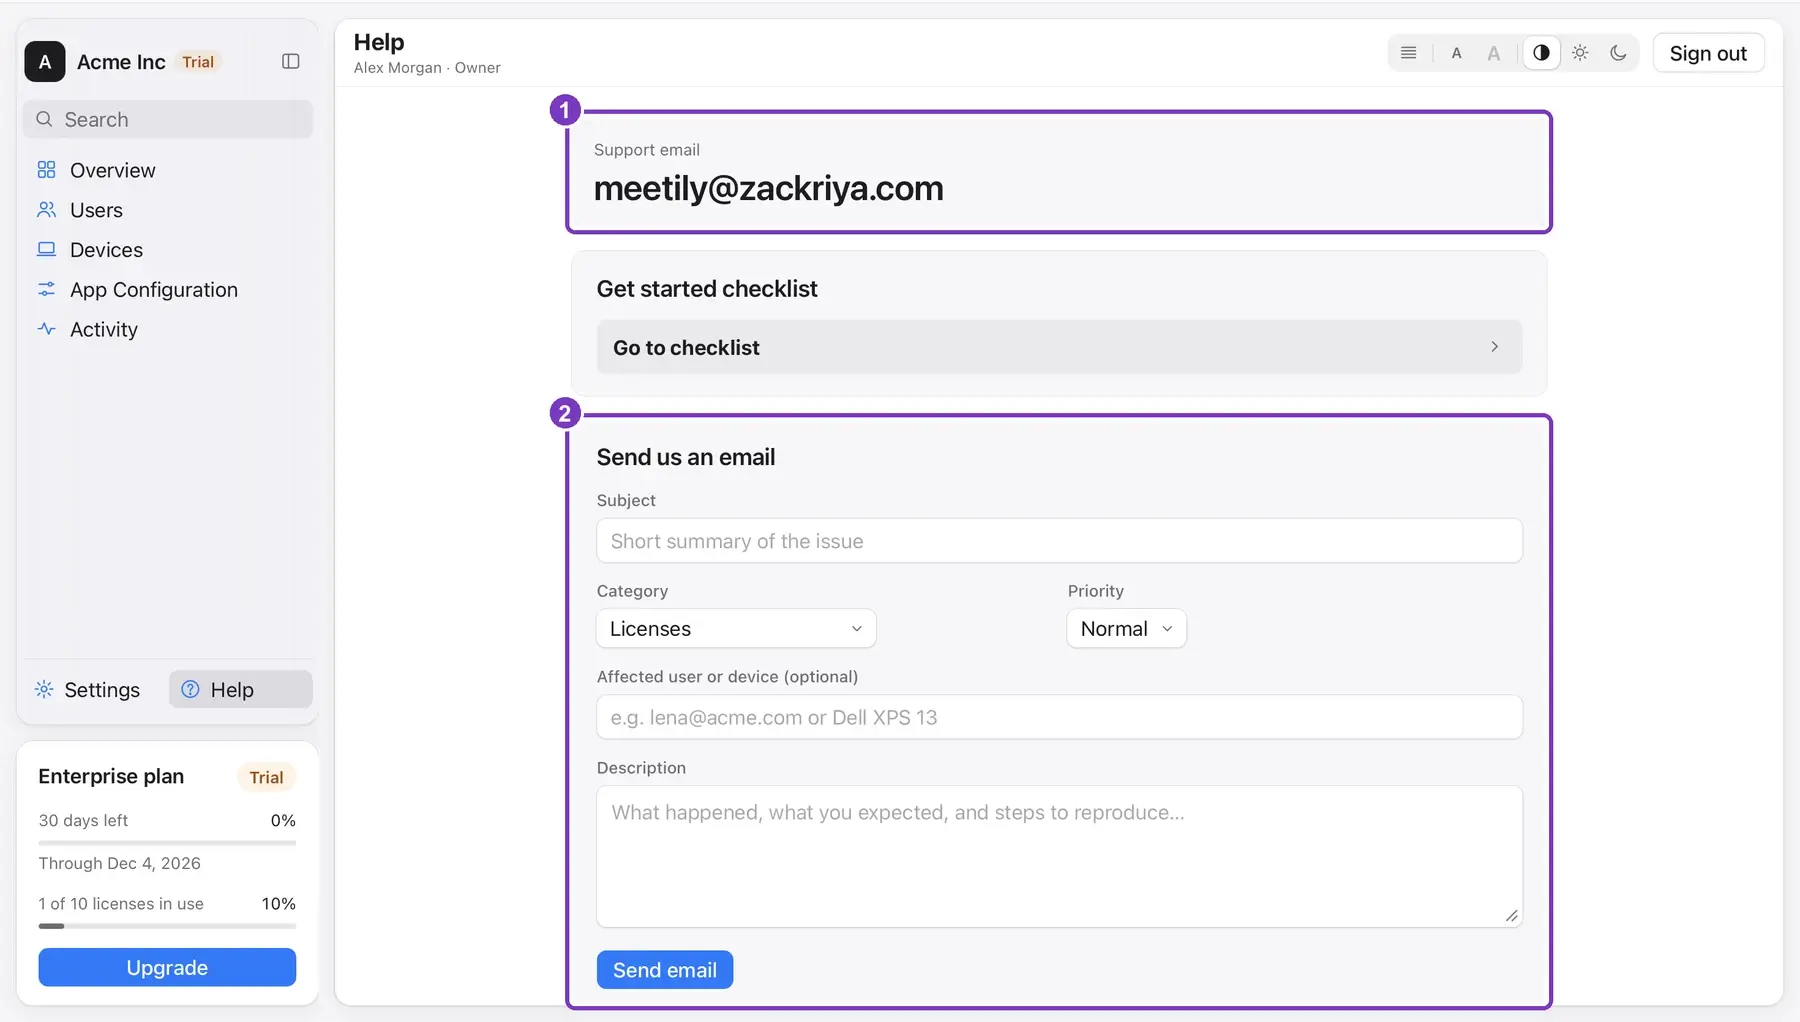
- Our support email.
- Send us an email: fill it in and select Send email. It opens your own email app with the message ready to send. Name the user or computer if the problem is about one.
No email app opens? Write to meetily@zackriya.com yourself, or use Open the help form below the form.
Add another admin
Open Settings, then the Dashboard access tab. Only the owner can invite admins.
Type the new admin's work email and select Send invite.
Select Copy invite link and send the link to them.
They open the link and set their password. Then they can sign in to the dashboard.
Server commands
For the few jobs you do on the server itself. On Linux and Mac, run sudo meetily-server <command>. On Windows, open a terminal as administrator and run "C:\Program Files\Meetily Enterprise Server\meetily-server.exe" <command>.
| Command | What it does | When you need it |
|---|---|---|
setup-link | Prints a new setup link for the first owner. It works once, for 24 hours, and only while there is no owner. | The installer's link was lost or ran out. |
reset-password | Prints a password reset link for the owner. It works once, for 30 minutes. | The owner forgot the password. |
reset-owner | Removes the owner, signs them out, and prints a setup link for a new owner. | The owner left, or the account is lost. |
backup | Saves one copy of the database in the backups folder of the data folder, and prints its path. | Before a big change. |
restore <file> | Stops the service, puts the backup back and starts it again. It saves a copy of the current database first. | To go back to a backup. |
upgrade | Stops the service, backs up the database, swaps in the new program, updates the database and starts again. On any failure it rolls back by itself. | A new version is out. |
rollback | Puts back the program and database from before the last upgrade. | Something is wrong after an upgrade. |
integrations on|off | Allows integrations (AI assistants, apps and webhooks) for the whole organization, or turns them off. | Your policy on integrations changes. |
uninstall | Stops and removes the service. The data folder stays. | Removing the server. |
help | Shows every command. | Any time. |
Upgrade to a new version
One command downloads the new version and upgrades:
curl -fsSL https://meetily.ai/server | sudo bash -s -- --upgradeCopy the new meetily-server.exe to a folder of its own, then run this in a terminal opened as administrator. The setup program is for the first install only.
& "C:\Program Files\Meetily Enterprise Server\meetily-server.exe" upgrade --from "C:\path\to\new\meetily-server.exe"Frequently asked questions
Run sudo meetily-server setup-link on the server (on Windows, meetily-server.exe setup-link as administrator). It prints a new link that works once, for 24 hours.
No. Send everyone the Organization key. Each person pastes it once in Meetily and appears in Users by themselves.
Yes. Settings > Server shows the install command for SCCM and Intune. With it, Meetily installs and activates by itself, with no key to paste.
Macs with Apple silicon, and 64-bit Windows.
Not with the default settings. Parakeet transcribes and Built-in AI writes the summary on each person's computer. If you choose your own AI server or a cloud service, that service's data handling applies.
Run sudo meetily-server reset-password on the server. It prints a reset link that works once, for 30 minutes. If the owner has left, use reset-owner instead.
Email us your request key: in Settings > Server, select Copy request key and send it to meetily@zackriya.com. Or select Upgrade in Settings > Plan, then Use an email template. We reply with an authority key; paste it in Settings > Server > Authority key and select Apply.
Need more help? Email meetily@zackriya.com, or use Help in your dashboard.
Related
- Transcription providers - what each transcription option does on a person's computer.
- Summary providers - the summary options you can choose for your organization.
- Summary Templates - how templates shape the meeting notes.
Last updated on